This article will show you how can you uninstall BlueStacks completely from your computer with very few quick steps. It doesn’t matter for what reason you want to uninstall BlueStacks completely from your computer, either to reinstall it or get rid of the software at all. Just keep reading and your problem will be resolved soon.
What is BlueStacks anyway?
BlueStacks is a very useful application for Windows users that allows users to run Android apps as they are actually running on an Android smartphone. It is the best out of very few working bridges between Windows PCs and Android OS and it is pretty darn good at its job. Installing and using Android apps is as simple as doing it on any Android smartphone. You won’t feel a difference between UIs but the advantage is that you would have a bigger screen than your mobile.
The only bad thing about Bluestacks
However many times users face some minor problems while uninstalling Bluestacks. The most common problem is that it allows the user to uninstall the program from the computer but it doesn’t clean up after it gives confirmation to the user that the uninstallation process completed. This leads to the error message that users get when they try to reinstall BlueStacks in the future. The user usually gets an error message: A BlueStacks Software is also installed on this device, First uninstall it to continue..
These leftovers live in the user’s computer as few files in Program Files directory or registry keys. So The real issue is that the user will have to clean these leftovers manually if BlueStacks forget to do so. It is a very straightforward process to remove these leftovers and also cleans your Windows PC so it is the win-win situation anyway.
A solution by BlueStacks
A very long time after we published this article, BlueStacks finally came up with some solution which helped many users to uninstall BlueStacks completely from the computer. Just follow the steps as mentioned on that page, remove temporary files from the temp directory and execute the cleanup process as mentioned in the article.
Please let us know if this solution helped you or not in the comment section below. But, if you are still getting the error then keep reading further, we have mentioned a few steps below that will surely remove BlueStacks from your computer.
Don’t worry, we are here to help
We found that many of the BlueStacks users are facing this problem that they are not able to uninstall BlueStacks from their device completely. To solve this problem I made a YouTube video but forgot to write an article on the same, so here is the video:
Few Easy Steps to Uninstall Bluestacks completely
If you don’t want to watch the video then you can simply read the article below and uninstall BlueStacks completely. So the steps are:
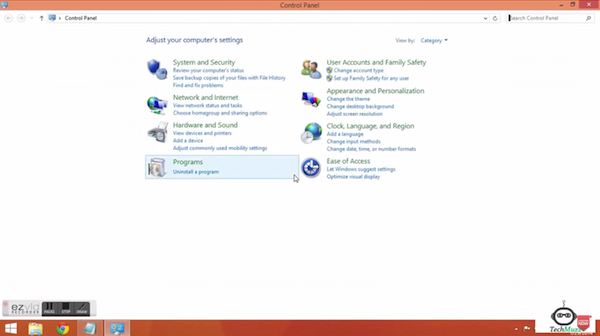
Step 1: Uninstall BlueStacks from the Control Panel as we uninstall other programs. So Open Control Panel.
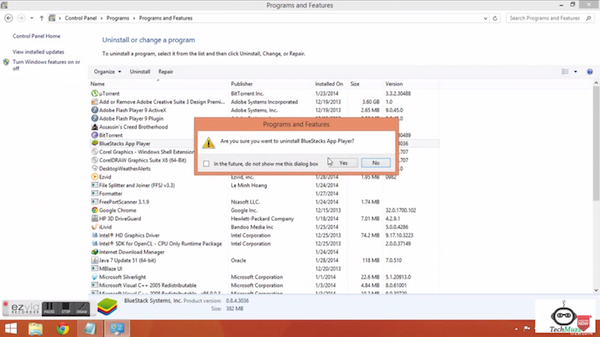
Step 2: Then navigate to Control Panel\Programs\Programs and features and Select BlueStacks and click Uninstall and follow the on-screen options to uninstall BlueStacks.
Step 3: Go to C:\ProgramData (Note: The folder will be hidden so unhide the folders).
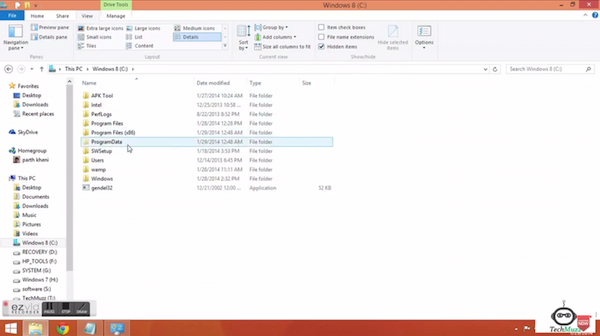
Step 4: Delete BlueStacksSetup folder from there.

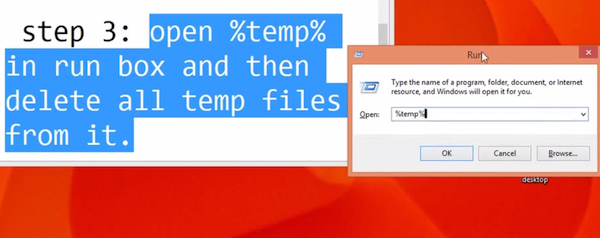
Step 5: Run %temp% command in the Run box (Windows + R) and delete all temporary files in the temp folder.
Step 6: That’s all.
But, If you are still not able to install BlueStacks on your computer then follow the final step below.
Extra Step: Now finally we will remove BlueStacks registry files from Registry editor. For this write regedit command in Run command box (Windows + R). And then navigate to HKEY_LOCAL_MACHINE\SOFTWARE\BlueStacks. Select all keys and delete them all.
We hope this article must have the help you to uninstall BlueStacks completely from your pc and you can install it again whenever you want to without any errors. But, if you are facing any problem even after performing all the steps listed above, then feel free to ask in the comment section. We will be glad to help you.
Enjoy & Stay techie…
This is not working…Well
I have installed POKKT for earning money and i uninstalled Bluestacks using your Process.
and restart then re-install But POKKT detect that i have already used this..
Please see and solve this 🙂
HI Vikas,
This post is meant to help those who face the problem in uninstalling BlueStacks properly.
There are some bugs in BlueStacks which blocks users to re-install BlueStacks by saying you have already installed one version and remove it before re-installing it again.
This post is not related to problem that you are asking. According to me, may be the app you have installed fetched the MAC address of the device that’s why it is restricting you now.
I tried all of the above and I still cannot delete BstkDrv.sys,
everytime i try to its says that it is open in another program and i tried to check it in task manager but did not find it, additionally i tried to forcefully delete through cmd but it said access denied.
Hi Minh,
Please download any third party free file remover software which could delete a file from the disk even the OS couldn’t do it. Usually, this software is built to delete files by terminating the current process that might be using it, so we would suggest you try such software first.
Please let us know the software that you try to remove the file, so future users will have a reference to follow you. 🙂
Thank you
In reg edi,under local machine ,in software,there is bluestack folder but when deleting ,it says error while deleting key
I accidently deleted the bluestacks folder before uninstalling it from control panel.now even trying all steps from all websites,it didn’t work.when i try to install bluestacks,it says”a later version of bluestacks is already installed”.is there any other solutions?
reinstall windows.
later version reinstall and try to uninstall from control panal
In program data,Bluestacks there is a file named Logs sized 3.80mb will be not deleted.what to do
Hi so I was wondering if someone with bluestacks could find a file path of bluestacks by right clicking on the shortcut that opens it and telling me what folder and file it opens.
I can’t find where the bluestacks shortcut leads to because it was removed on my computer.
Thanks
Tried all those but the last one step 4 didn’t work for me.so my bluestacks shows its still installed on local disc c when am re installing it.how do i go about this?
My bluestacks stucks in the loading part and keeps loading. But it doesn’t start. I have tried reinstalling. but it keeps doing the same thing. Can you guys help?
it dosen’t working i tried all the steps but my bluestacks2 isn’t installing please help me.
I think it worked.
Thank you!
When i was installing bluestack due to power cut it stops and when i switch on my pc again and try to install bluestack again it shows bluestack is already install to your pc. What to do??
Hi Jignesh,
Try to do other steps like step 2 and step 3 with checking registry editor. After this try to install it again.
Thank you.
thanks worked.
Thank you so much! It definitely helped a lot!
Works well. Thx a lot.
THANK YOU SOO MUCH!!! I ASSURE EVERYBODY ON THIS PAGE TO FOLLOW THESE STEPS CAREFULLY! SOME SAY IT DOSNT WORK! BUT FOR ME, IT DID!
thanq .it is working
IS STILL TELLING ME IS INSTALL
(urgent) please help me do i have to delete all the tamp files that are there
It would be better if you delete them all. If you could isolate only BlueStacks’s files from that cluster then delete only isolated files only.
DEAR,
I have one issue with complete deleting BstkDrv.sys from my program file(x86). which was my thinking that I disturb hidden setting of this drive . only this is remain rest bluestake are deleted kindly guide me because i tried many many time but i did not succeed in deleting this
thanks
Hi Sahida,
Please download any third party file remover software which could delete a file from the disk even the OS couldn’t do it.
This kind of softwares could delete any files and they are free too.
Thank you
Very Very Thanks Man, It Worked For Me In The Last Step. Thanks A Lot….
when i tried the last step it doesnt have anything to be deleted
Its not necessary that you have to delete files, it is better that you don’t have any files to delete.
Thank you, finally i uninstall it ..
thanks man it works for me
Thank Its working
Thank you! It works!
It worked for me!! Thank you for the guide. Keep it up man.
Great content! thank you
Great, thank you so much. God bless!
Thanks
It worked for me!! Thank you for the guide. Keep it up man.
thank you for helping me
Great content! thank you
thank you very much
bu ve benzer sistem dosyalarını silmek için elinizi çabuk tutmalısınız bilgisayarınızı yeniden başlatın ve bilgisayar açılır açılmaz daha dosyalar çalışmaya başlamadan silmek istediğiniz sistem dosyasını rahatlıkla silebilirsiniz tabi eli çabuk biriyseniz ??
help a lot, thanks
I appreciate you helping me learn more about the topic.
thank you very much
Cool, thanks
It worked for me!! Thank you for the guide. Keep it up man.
Finally found u
It worked for me!! Thank you for the guide. Keep it up man.
Great content! thank you
Thank you so much. its perfect
A bundle of Thanks I was searching since a week you made my day.
Thanks for this article.
help a lot, thanks
Appreciated your approach to share technology related knowledge, and I feel these sharing are upto a considerable standard. Thank you
Thank you
Very useful information.Thanks.